Thursday, 27 February 2020

PostgreSQL Streaming


Check Proxy will be working or not

export http_proxy="http://xxxxx.xx.xx.net:3128/"
export https_proxy="http://xxxxx.xx.xx.net:3128/"
export no_proxy=localhost,127.0.0.1,Host IP (LINUX HOST IP)
export DOCKER_HOST="tcp://127.0.0.1:2375"

After setting the exports, then check


  Getting 200 means proxy is working fine.
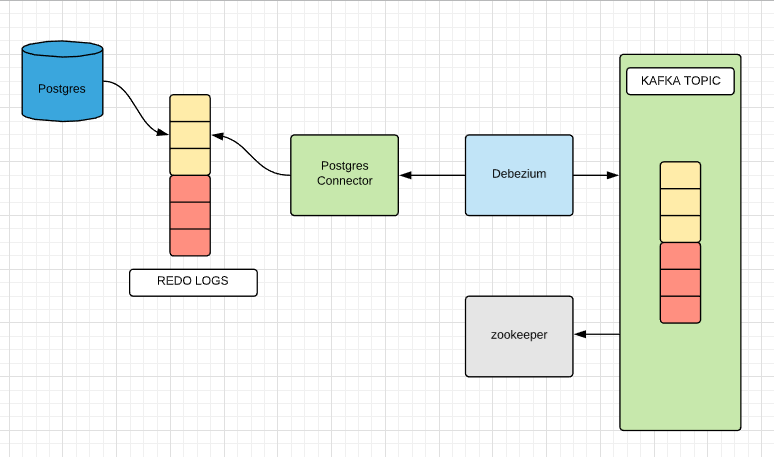


Debezium Architecture


Using Change Data Capture (CDC) is a must in any application these days.
No one wants to hear that the changes they made did not reflect in the analytics because the nightly or hourly sync job has not pulled or pushed the data. The common problem is that there are a raft amount of web applications which are OLTP (Online Transaction Processing) and are often backed by a relational database such as Oracle, PostgreSQL, MySQL etc.

Performing real-time data analytics on these database systems requires usage of big joins and aggregations which results in locks as these database systems are ACID complaint and provide good isolation levels.
These locks may be held for a long duration which could affect the performance of the application for the live users.

Solution - Change Data Capture Pattern:
-----------------------------------------------------
Thus, it makes sense to stream data into other teams of your organisation which could perform analytics on it using spark jobs, hive queries or whatever is your preferred framework for big data madness.
The following technologies will be used to accomplish capturing data change.
Apache Kafka — It will be used to create a messaging topic which will store the data changes happening in the database.
https://kafka.apache.org/
Kafka Connect — It is a tool used for scalable and reliable data streaming between Apache Kafka and other systems. It is used to define connectors which are capable of moving data from entire databases into and out of Kafka. The list of available connectors is available here.
Debezium — It is a tool used to utilise the best underlying mechanism provided by the database system to convert the WALs into a data stream. The data from the database is then streamed into Kafka using Kafka Connect API.
https://github.com/debezium/debezium


Capturing data from PostgreSQL into Apache Kafka topics.
Debezium uses logical decoding feature available in PostgreSQL to extract all persistent changes to the database in an easy to understand format which can be interpreted without detailed knowledge of the database’s internal state. More on logical decoding could be found here.
Once, the changed data is available to Debezium in an easy to understand format it uses Kafka Connect API to register itself as one of the connectors of a data source. Debezium performs checkpointing and only reads committed data from the transaction log.
Let us run an example
To run this example you will require docker.

Start a PostgreSQL instance
docker run --name postgres -p 5000:5432 debezium/postgres

Start a Zookeeper instance
docker run -it --name zookeeper -p 2181:2181 -p 2888:2888 -p 3888:3888 debezium/zookeeper

Start a Kafka instance
docker run -it --name kafka -p 9092:9092  --link zookeeper:zookeeper debezium/kafka

Start a Debezium instance
  One important point here:
                   Check in your docker instance echo $DOCKER_HOST, if it’s not there then
export DOCKER_HOST="tcp://127.0.0.1:2375"

checking cut command:
-----------------------------------------------------------
$(echo $DOCKER_HOST | cut -f3 -d'/' | cut -f1 -d':')
echo "tcp://0.0.0.0:2375" | cut -f3 -d'/' | cut -f1 -d':'

check cut command working or not.

docker run -it --name connect -p 8083:8083 -e GROUP_ID=1 -e CONFIG_STORAGE_TOPIC=my-connect-configs -e OFFSET_STORAGE_TOPIC=my-connect-offsets -e ADVERTISED_HOST_NAME=$(echo $DOCKER_HOST | cut -f3 -d'/' | cut -f1 -d':') --link zookeeper:zookeeper --link postgres:postgres --link kafka:kafka debezium/connect


Connect to PostgreSQL and create a database to monitor

docker exec -it postgres psql -U postgres
psql -h localhost -p 5000 -U postgres
CREATE DATABASE inventory;
CREATE TABLE dumb_table(id SERIAL PRIMARY KEY, name VARCHAR);

What we just did?


Create connector using Kafka Connect

url -X POST -H "Accept:application/json" -H "Content-Type:application/json" localhost:8083/connectors/ -d '
{
 "name": "inventory-connector",
 "config": {
 "connector.class": "io.debezium.connector.postgresql.PostgresConnector",
 "tasks.max": "1",
 "database.hostname": "postgres",
 "database.port": "5432",
 "database.user": "postgres",
 "database.password": "postgres",
 "database.dbname" : "inventory",
 "database.server.name": "dbserver1","database.whitelist": "inventory","database.history.kafka.bootstrap.servers": "kafka:9092","database.history.kafka.topic": "schema-changes.inventory"
 }
}'

Response:
{"name":"inventory-connector",
 "config":{"connector.class":"io.debezium.connector.postgresql.PostgresConnector",
           "tasks.max":"1","database.hostname":"postgres","database.port":"5432","database.user":"postgres","database.password":"postgres","database.dbname":"inventory","database.server.name":"dbserver1","database.whitelist":"inventory","database.history.kafka.bootstrap.servers":"kafka:9092","database.history.kafka.topic":"schema-changes.inventory","name":"inventory-connector"},"tasks":[],"type":"source"}

Verify the Connector is created


curl -X GET -H "Accept:application/json" localhost:8083/connectors/inventory-connector

{"name":"inventory-connector",
 "config":{"connector.class":"io.debezium.connector.postgresql.PostgresConnector",
           "database.user":"postgres",
                           "database.dbname":"inventory",
                           "tasks.max":"1",
                           "database.hostname":"postgres","database.password":"postgres",
                           "database.history.kafka.bootstrap.servers":"kafka:9092",
                           "database.history.kafka.topic":"schema-changes.inventory",
                           "name":"inventory-connector","database.server.name":"dbserver1",
                           "database.whitelist":"inventory","database.port":"5432"},"tasks":[{"connector":"inventory-connector","task":0}],"type":"source"}


Start a Kafka Console consumer to watch changes

docker run -it --name watcher --rm --link zookeeper:zookeeper --link kafka:kafka debezium/kafka watch-topic -a -k dbserver1.public.dumb_table

Result

Reference:


Wednesday, 26 February 2020

JVM Simulator

Java people wants to know more about inside JVM like heap area, static area, method area and thread area.

This jvm simulator developed by shakeel, But this jvm simulator will cover the topics conceptual way.

jvm simulator download
--------------------------------------------------------------------------

once you had download then using these below commands to run the program.
C:\jvmSimulator> java Jvm GarbageTest

It will open the applet, which will ask the password 
then type password:shakeel

Tuesday, 25 February 2020

ELK Demo Windows on Simple Java and Spring Boot Services


Why Centralized Logging ELK in Distributed System ?

Log Consolidation or Log Streaming which approach you had chosen for your microservices architecture ?

(In my project, I had choose log consolidation means every service had log file, then logstash point out the log file read and put into elastic)

(In log streaming, every service no need to maintain log file, then immediate push the data into apache stream)

1) Generally in monolith application we are restricting the logs in production / development due to file size it will generate.

2) In Distributed System Assume Transaction T1 involves 3 microservices then
    1) 1st Microservice it's own logs - india data center
    2) 2nd Microservice it's own logs - american data center
   3) 3rd Microservice it's own logs - Germany data center

Then how you will trace logs. It's very difficult. So Solution will be centralized logging.


The components of the ELK stack are:
Elasticsearch ( 2.3.5)  – Search and analyze data in real time.
Logstash (2.3.4) – Collect, enrich, and transport data.
Kibana (4.5.4) – Explore and visualize data

Install the JDK 8, make the environment variable JAVA_HOME=JDK DIRECTORY

Create a folder to keep the ELK components grouped: D:\ELK
This directory will be used to keep all ELK components grouped in the same folder.

Configure Elasticsearch
Elasticsearch Folder : D:\ELK\elasticsearch-2.3.5
In order to make Elasticsearch REST API only available within the ELK machine, we need to make one modification inside the “D:\ELK\elasticsearch-2.3.5\config\elasticsearch.yml” file:
Find the line:
 #network.host:192.168.0.1
Replace by the line
Network.host:127.0.0.1

Goto Command Prompt below folder:   D:\ELK\elasticsearch-2.3.5\bin>elasticsearch.bat

Now Elasticsearch service working on localhost:9200

Configure Logstash
Logstash folder: “D:\ELK\logstash-2.3.4”.
Now create a config file logback-listener.conf and put it under “D:\ELK\logstash-2.3.4\bin”
logback-listerner.conf

input {
tcp {
port => 5050
codec => "json"
mode => "server"
}
}
output {
elasticsearch {
hosts => [ "127.0.0.1:9200" ]
index => "logstash-%{+YYYY.MM.dd}"
}
stdout { }
}

Here 2 usecases are there
Simple Java Program – using logback-listerner.conf
Spring Boot Microservice – using logstash.conf

Goto Command Prompt
D:\ELK\logstash-2.3.4\bin> logstash -f logback-listener.conf

logstash tcp listener port is 5050

Configure Kibana
 Kibana folder:  “D:\ELK\kibana-4.5.3-windows”.
 Modify “D:\ELK\kibana-4.5.3-windows\config\kibana.yml” file like below

server.host: "0.0.0.0"
 And replace by the line:
server.host:127.0.0.1


Simple Java Program Example:

Requires Jars:
cal10n-api-0.8.1.jar
logback-classic-1.1.7.jar
logback-core-1.1.7.jar
jackson-core-2.10.2.jar
jackson-databind-2.10.2.jar
jackson-annotations-2.10.2.jar
logstash-logback-encoder-4.7.jar (   Configure LogstashTcpSocketAppender
LogstashTcpSocketAppender is a specialized log appender created by the Logstash team and distributed as a Maven dependency. This library has all the necessary logic to send your log messages, formatted as JSON, to a remote server over the TCP protocol.
)


Once the mentioned jars is available in our classpath we can now configure Logback using logback.xml.


<?xml version="1.0" encoding="UTF-8"?>
<configuration debug="true">
            <appender name="stash"
                        class="net.logstash.logback.appender.LogstashTcpSocketAppender">
                        <destination>127.0.0.1:5050</destination>
                        <!-- encoder is required -->
                        <encoder class="net.logstash.logback.encoder.LogstashEncoder" />
            </appender>
            <root level="DEBUG">
                        <appender-ref ref="stash" />
            </root>
</configuration>

Below Example I had taken from eloquentdeveloper.com


import org.slf4j.Logger;
import org.slf4j.LoggerFactory;
 /**
 * @author eloquentdeveloper.com
 */
public class MyClass {

            private static final Logger LOGGER = LoggerFactory.getLogger(MyClass.class);

            public static void main(String[] args) throws Exception {
                        for (int i = 0; i < 10; i++) {
                                    LOGGER.info("New customer successfully registered");
                                    LOGGER.warn("User password will expire in two days");
                                    LOGGER.error("Billing system is not available");
                                    Thread.sleep(200);
                        }
            }
}

Ramesh Analysis:
Here logback.xml plays key role, it will append all the logs into logstash tcp 127.0.0.1:5050.
Means Once user runs the application , these logs will be append into logstash tcp, then logstash will put these logs into elasticsearch.
Now Kibana connects to elasticsearch to show the results.


Check the log entries using Kibana


Simple Java Class Summary:
Java application sends log files to logstash, logstash listens tcp port on 5050, then accepts the input redirect to output elasticsearch.Now kibana enquires the elasticsearch.


Usecase 2: SpringBoot Microservices (Refer: https://www.javainuse.com/spring/springboot-microservice-elk)

Please refer javainuser for SpringBoot Project for this demo and there is no need to change our ELK stack.


  • Now stop the logstash
  • Now configure the new logstash.conf
input {
  file {
    type => "java"
    path => "C:/elk/spring-boot-elk.log"
    codec => multiline {
      pattern => "^%{YEAR}-%{MONTHNUM}-%{MONTHDAY} %{TIME}.*"
      negate => "true"
      what => "previous"
    }
  }
}

filter {
  #If log line contains tab character followed by 'at' then we will tag that entry as stacktrace
  if [message] =~ "\tat" {
    grok {
      match => ["message", "^(\tat)"]
      add_tag => ["stacktrace"]
    }
  }

}

output {
  stdout {
    codec => rubydebug
  }

  # Sending properly parsed log events to elasticsearch
  elasticsearch {
    hosts => ["localhost:9200"]
  }
}


  • Kept the logstash.conf under C:\ELK\logstash-2.3.4\bin
  • Open the Command Prompt, C:\ELK\logstash-2.3.4\bin> logstash  -f logstash.conf
  • Now the logstash takes input from C:/elk/spring-boot-elk.log and output elasticsearch


Testing the SpringBoot Services and Check the Kibana

Open the browser: http://localhost:8080/elk, for this logs stored C:/elk/spring-boot-elk.log
Now logstash takes input of this C:/elk/spring-boot-elk.log, then output to elasticsearch
Now kibana connect to elasticsearch


Sunday, 23 February 2020

TemplateMethod Design


 What is meaning Template?
        Template defines sequence of steps.
What is the meaning of Template Method?
        Template Method defines sequence of methods (order of methods)
For Example:
To construct house Engineer has given a Blueprint Template like below
1    1) buildBasement
2    2)  buildPillars
3    3)  buildRoof
4    4)  buildWalls
First, we need to construct the basement, once basement have finished then we will build pillars.
Once pillars have finished then we will build roofs.
Once roofs have finished then we will build walls.

Note: pillars work depend on basement work, roof work depend on pillars work, walls work depend on roof work.
We cannot build roofs without basement and pillars.

Intent: (Refer oodesign.com)
Define the skeleton of an algorithm (Steps of methods) in an operation, deferring some steps to subclasses.
Template Method lets subclasses redefine certain steps of an algorithm without letting them to change the algorithm’s structure.


package templatemethod;

public abstract class House {
              
                 /**
     * buildhouse is a TemplateMethod. This method should be
     * final hence other class can't be re-implement and change the order of the
     * steps.
     */
    public final void buildhouse() {
                 buildBasement();
                 buildPillars();
                 buildRoof();
                 buildWalls();
    }
    protected abstract void buildBasement();
    protected abstract void buildPillars();
    protected abstract void buildRoof();
    protected abstract void buildWalls();

}


package templatemethod;

public class DuplexHouse extends House {

               @Override
               protected void buildBasement() {
                              System.out.println("Building the DuplexHouse basement");
               }

               @Override
               protected void buildPillars() {
                              System.out.println("Building the DuplexHouse pillars");
               }

               @Override
               protected void buildRoof() {
                              System.out.println("Building the DuplexHouse roofs");
               }

               @Override
               protected void buildWalls() {
                              System.out.println("Building the DuplexHouse walls");
               }
}

package templatemethod;

public class Bungalow extends House{

               @Override
               protected void buildBasement() {
                              System.out.println("Building the Bungalow basement");
               }

               @Override
               protected void buildPillars() {
                              System.out.println("Building the Bungalow pillars");
               }

               @Override
               protected void buildRoof() {
                              System.out.println("Building the Bungalow roofs");
               }

               @Override
               protected void buildWalls() {
                              System.out.println("Building the Bungalow walls");
               }

}

In my abstract class House why I had kept protected abstract methods ?
  protected modifier allows the access of protected member in subclasses (in any packages)

package ramesh;
class HouseFactory {
       public static void main(String[] args) {
               House house= new DuplexHouse();
               house.buildHouse();

               house = new BungalowHouse();
               house.buildHouse();
       }
}

Now my intension of protected I don't want to expose abstract methods other than subclasses here HouseFactory in ramesh package, it's having visibility of buildHouse() method only.


Sunday, 16 February 2020

Facade Pattern


Facade Pattern Intent

Provide a unified interface to a set of interfaces in a subsystem. Facade defines a higher-level interface that makes the subsystem easier to use.
Wrap a complicated subsystem with a simpler interface.
Main Intension to reduce Remote service calls.

UseCase:  
a) System - Udupi -  VegService
b) Sysem – Krutunga - Nonveg Service
Client using System service to order items.   
Udupi - System    
public class VegService {
           
            public String getDosha() {
                        System.out.println("Dosha");
                        return "Dosha";
            }
           
            public String getIdly() {
                        System.out.println("Idly");
                        return "Idly";
            }
           
            public String getPoori() {
                        System.out.println("Poori");
                        return "Poori";
            }
           
            public String getChapathi() {
                        System.out.println("Chapathi");
                        return "Chapathi";
            }
}

Krutunga - System
public class NonvegService {
           
            public String getChickenBiryani() {
                        System.out.println("Chicken Biryani");
                        return "ChickenBiryani";
            }
           
            public String getMuttonBiryani() {
                        System.out.println("Chicken Biryani");
                        return "ChickenBiryani";
            }

           
            public String getFishBiryani() {
                        System.out.println("Chicken Biryani");
                        return "ChickenBiryani";
            }
}


public class Client {
            public static void main(String... args) {
             //Ramesh Wants to order - 2 doshas and 2 Idlies from Udupi System
                        VegService vegService = new VegService();
                        String vegCombo = vegService.getDosha();
                        vegCombo += vegService.getIdly();
                        vegCombo += vegService.getDosha();
                        vegCombo += vegService.getIdly();
                       
            //Ramesh Wants to order - 1 chicken and 1 mutton biryani from Krutunga System
                        NonvegService nonVegService = new NonvegService();
                        String nonVegCombo = nonVegService.getChickenBiryani();
                        nonVegCombo += nonVegService.getMuttonBiryani();               
            }
}


Client orders 2 doshas and 2 idlies from Udupi System
              1 chicken and 1 mutton from Krutunga System

So Client making 2 doshas (2) + 2 idlies = 4 Remote Calls to Udupi System
   Client making 1 chicken (1) + 1 mutton (1) = 2 Remote Calls to Krutunga System.


Now ZomatoServiceFacade came into market, This ZomatoServieFacade will taken care of Udupi System and Krutunga System.

Now Client will contact ZomatoServiceFacade instead of direct call to Udupi and Krutunga System.


public class ZomatoServiceFacade {
           
            //System - Udupi Veg Service
            VegService vegService = new VegService();
           
            //System - Krutunga Nonveg Service
            NonvegService nonVegService = new NonvegService();
           
            public String vegCombo() {
                        String vegCombo = vegService.getDosha();
                        vegCombo += vegService.getIdly();
                        vegCombo += vegService.getDosha();
                        vegCombo += vegService.getIdly();
                        return vegCombo;
            }
           
            public String nonVegCombo() {
                        String nonVegCombo = nonVegService.getChickenBiryani();
                        nonVegCombo += nonVegService.getMuttonBiryani();
                        return nonVegCombo;
            }
           

}


public class Client {
           
            public static void main(String... args) {
                        ZomatoServiceFacade zomatoService = new ZomatoServiceFacade();
                        String vegCombo = zomatoService.vegCombo();
                        String nonVegCombo = zomatoService.nonVegCombo();
            }
}


Now Client Calling the ZomatoServiceFacade Service for vegCombo and nonVegCombo which will suitable for our requirement.

Client – 1 vegCombo + 1 nonVegCombo = Total 2 Remote Calls to ZomatoService.

Due to Façade Remotecalls reduced.